Introduction
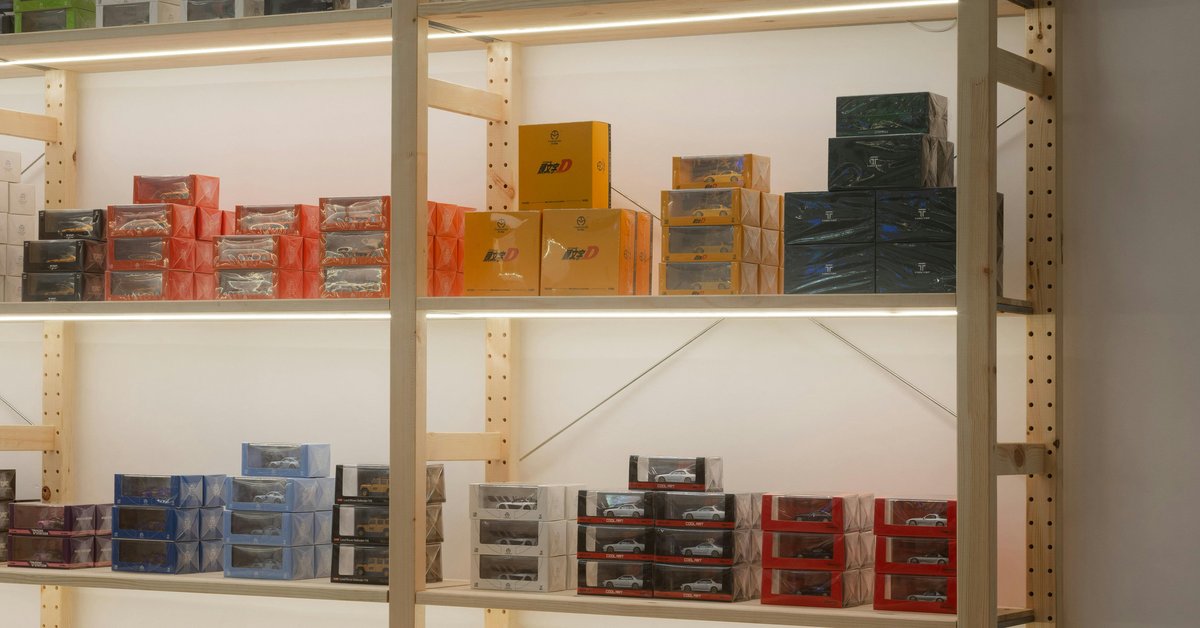
If you collect figurines, model cars, coins, or vintage plates, you already know the problem. You put them on a shelf, step back, and they just look flat. Or worse, a cheap bulb casts a harsh glare that hides the detail you actually bought the piece for. That’s where getting your display lighting right changes everything.
I’ve been collecting for over 15 years, and I’ve learned that knowing what you’re looking at matters more than how much you spend.
This guide is for collectors who want to use display lighting collectibles led track systems to show off their items without damaging them or washing them out. We’ll cover what LED track lighting can do for your collection, the key specs to watch for, how to position the lights, and the common mistakes that waste your time and money. The goal isn’t to turn your shelf into a showroom. It’s to make your collection look as good as it did the day you bought it.
Why LED Track Lighting Is a Good Fit for Collectible Displays
LED track lighting solves the biggest problems that other lights create. Halogen and incandescent bulbs throw off a lot of heat. Put one of those too close to a vintage action figure or a wax-sealed coin, and you’re asking for warping or discoloration. LEDs run cool. That matters when your display is enclosed or when you have sensitive materials.
Beyond heat, LED track heads are adjustable. You can point one at a centerpiece figurine and another at a row of smaller items without moving the fixture itself. That flexibility is the main reason collectors switch from fixed ceiling lights or clamp-on desk lamps. You don’t have to compromise on where the light falls.
There’s also the UV factor. Standard LEDs emit very little UV radiation compared to sunlight or older fluorescent tubes. That matters for anything that fades-paper, fabric, paint, or photographs. A UV-filtering glass cabinet helps, but starting with a low-UV light source gives you an extra layer of protection.
The tradeoff is upfront cost. A quality LED track system costs more than a basic track with halogen bulbs. But you’ll likely never replace the bulbs, and your electricity bill will be lower. Over five years, the savings add up. So if you’re setting up a permanent display, LED is the long-term play. For collectors who are starting fresh, ready-to-install kits like an LED track lighting kit designed for shelves can simplify the initial setup.
Key Specifications to Look for in LED Track Fixtures
When you start shopping for LED track heads, the spec sheet matters. Here are the numbers you actually need to understand.
Color Temperature (measured in Kelvin): 3000K gives a warm, yellow-ish light that is flattering for wood models, amber glass, or anything with a vintage feel. 4000K is neutral, crisp but not cold. It works well for modern collectibles like pop culture statues or die-cast cars. 5000K is cool and bluish. It can make silver coins or white porcelain pop, but it is not forgiving on warm-toned items. Most collectors land on 3000K or 4000K. If you mix color temperatures in the same display, it will look inconsistent.
Color Rendering Index (CRI): This is the single most important spec for collectibles. CRI measures how accurately a light source shows colors compared to natural sunlight. For collectibles, aim for CRI 90 or higher. At 80 CRI, a matte-painted action figure looks dull. At 95 CRI, the same figure has depth and texture. A common mistake is buying a cheap fixture that claims 90+ CRI on the box but actually tests at 82. If you can, buy from a brand that publishes verified lab results. Checking for LED track lights with high CRI 90+ ratings is a reliable way to start.
Beam Angle: This controls how wide the light spreads. A 15-degree spot creates a tight pool. It’s good for one small item like a coin or a single figurine. A 40-degree flood spreads light over a wider area. It works for a shelf of books or a row of larger items. For most displays, a mix of both works best-narrow spots for focal points, wider floods for fill light.
Lumens: This is the total brightness. For a typical display case, 300–500 lumens per head is usually enough. You don’t need stadium-level brightness. You want the light to be even and controlled, not overpowering.
Comparing Track Lighting Types: H Track, J Track, and Monorail
Track systems come in a few different shapes. If you already have a track in your display case, you need to match the type. If you’re starting from scratch, here is what each option gives you.
H-Track (line voltage): This is the most common type. The track has three internal conductors. Most track heads are labeled as H-track compatible. Parts are easy to find on Amazon and at hardware stores. If you have a standard shelf or glass cabinet, H-track is the easiest to install and maintain. The only downside is that the track itself is rigid, so it can’t curve around a custom-shaped display.
J-Track (line voltage): J-track looks similar to H-track but has a slightly different internal shape. It’s less common, but some high-end brands use it. If you buy a J-track system, you need heads made for J-track. They are not interchangeable. Only go this route if you already own a J-track system or if a specific fixture you want forces you to.
Monorail (low voltage): Monorail uses a single wire that can be bent into curves, angles, or shapes. This is the best option for custom display cases with curved glass or irregular layouts. Because it runs on low voltage, you need a transformer. The system costs more overall, and installation is less DIY-friendly. But if your display demands flexibility, monorail is the only choice.
For most collectors, H-track is the best starting point. It’s affordable, parts are easy to swap, and you can expand it later. If you need curved layouts, look at monorail. Avoid J-track unless you have a specific reason.
Choosing the Right Beam Angle for Your Collection
Beam angle is one of those specs that seems minor until you see the result. Too narrow, and you get a harsh spotlight with a sharp edge. Too wide, and the light spills everywhere, drowning out details.
For small items like coins, stamps, or tiny figurines, a 15- or 25-degree spot is ideal. The tight pool of light draws the eye and brings out surface texture. A 40-degree flood on a coin shelf just makes everything look washed out because the light is too spread out.
For larger items like model cars in a diorama, you want narrower spots per vehicle to create separation. If you use a wide flood over a row of cars, the shadows are soft and the cars blend together. Narrow spots at 15–25 degrees create pools of light that make each car stand out.
For shelves of vintage plates or books, a 40-degree or wider angle works better. It reduces harsh shadows across the face of the items, which lets you see the pattern or text clearly.
A common mistake is using all narrow beams across a long shelf. That creates an uneven, spotty look. You end up with bright circles and dark gaps. A better approach is to mix narrow spots for the focal pieces and wider floods for the rest. That gives you depth and balance.
Color Temperature and CRI: What Works Best for Collectibles
Color temperature and CRI work together. Choosing the wrong combination can make your collection look like it’s stored in a department store window at closing time.
For warm-colored items like amber glass, wood carvings, or vintage brass, 3000K is ideal. It enhances the richness of the material. At 5000K, those same items look cold and unnatural.
For modern collectibles like pop culture figures, die-cast cars, or LEGO sets, 4000K is a safe neutral. It is bright enough to show detail without adding a color cast. Most collectors end up here.
For silver coins, white marble statues, or anything with high-contrast patterns like porcelain, 5000K can be very effective. The cool light brings out sharp edges and metallic sheen. But if your display also includes warm-toned items, 5000K will make them look off. For mixed collections, stick with 4000K.
CRI is essential. At 80 CRI, a matte surface looks dull and lifeless. At 90 CRI, that same surface has visible grain and texture. At 95 CRI, you see the subtleties of paint, aging, and finishing. If your collection has hand-painted details or complex textures, go for 95 CRI or higher.
A practical tip: buy one fixture head before buying a whole system. Test it on your actual collection. Move it around. Try it at different heights and angles. See if the color temperature and CRI work for your specific items. That one test will save you from buying a full system that looks wrong.
In my experience, the collectors who take the time to learn grading and authentication before buying expensive pieces are the ones who build collections that actually appreciate.
Where to Position Track Heads for Maximum Impact
Positioning is where most people get it wrong. You can have the best fixture in the world, but if it’s aimed poorly, the item still looks bad.
For glass display cabinets, mount the track inside or just above the top. Aim the heads down at a 30- to 45-degree angle. This reduces glare on the glass and lets you see the items clearly. If you aim the heads straight down, the glass will reflect the light back at you. Keep the heads far enough back that the light hits the items before hitting the glass front.
For open shelving, mount the track a few inches from the front edge of the shelf. Aim the heads at a 30-degree angle toward the back. This creates a wash of light that covers the items without creating a hot spot right in front. If you mount the track at the back, the light will hit the wall first and you lose the directional highlight.
For wall-mounted shadow boxes or display cases, run the track along the top of the case and angle the heads diagonally across the surface. This creates a smooth gradient that highlights the full depth of the case.
A common mistake is putting the heads too close to the items. If a head is 6 inches from a figurine, the light creates a harsh hotspot and the edges of the item go dark. A good rule is to position the fixture at least 1.5 times the beam spread distance from the item. For a 20-degree spot, that means at least 12 inches away from the target.
Common Mistakes When Lighting a Collectible Display
Even experienced collectors make these errors. Here are the ones to avoid.
Mistake 1: One fixture for the whole cabinet. A single head in the center of a cabinet creates a bright circle in the middle and dark corners. At best, you get uneven lighting. At worst, the center piece is washed out and everything else is in shadow. Use multiple heads spread evenly.
Mistake 2: Cold temperature for a warm collection. A 5000K light on a shelf of amber glass and wood models makes them look gray and dead. Match color temperature to the dominant tones in your collection.
Mistake 3: No dimmer. Many LED track systems are dimmable, but people skip the dimmer because it adds cost. Without a dimmer, you lose the ability to adjust brightness for different times of day or reduce glare for photography. A dimmer is worth the extra $20–30.
Mistake 4: Buying cheap fixtures with low CRI. A $15 track head with 80 CRI will make your collection look worse than no light at all. You’ll end up replacing it. Spend a little more upfront for 90+ CRI, and you won’t have to redo the entire system later.
Installation Basics: Does Your Display Need a Pro?
If you have basic electrical knowledge, installing a track system over a shelf or inside a cabinet is a weekend project. H-track and J-track systems usually connect to a standard junction box. You wire the track connector to the power, clip the track in, and screw it down. Heads snap into the track. The whole process takes about an hour.
Monorail requires more patience. You need to install a transformer, route the cable, and tension it correctly. The bending and routing can take a few hours, especially the first time.
When should you hire a professional? If you need to run new wiring from a switch, cut into drywall, or install a dimmer that isn’t compatible with your existing switch, call a licensed electrician. The same goes for built-in display cases where the wiring is hard to reach. The cost of a pro is less than the cost of fixing a mistake.
Safety note: always turn off power at the breaker before working with electrical wiring. Check local code for permitted uses of track lighting in your area.
Recommended LED Track Lighting Kits for Collectors
Here are three types of kits that cover different collector needs. These are general descriptions of what to look for, not specific model numbers.
Best for casual collectors: Look for a basic 4-head H-track kit that comes pre-wired. Choose one with 3000K or 4000K bulbs and a CRI of 90+. These kits are inexpensive, easy to install, and work well for standard shelving. The downside is that the bulbs might not have adjustable beam angles-they usually come as fixed floods.
Best for serious collectors who want color accuracy: Look for a kit with 95+ CRI fixtures and adjustable beam angles (15–40 degrees). These kits are more expensive but give you the flexibility to highlight specific items precisely. They often include dimmable drivers. The downside is that the fixture heads are larger and may not fit inside a shallow display case.
Best for custom display cases: Consider a monorail kit with pendant-style heads. These let you bend the track to fit curved cabinets or odd-shaped spaces. Look for a kit that includes a transformer and dimmer. The downside is the higher cost and more complex installation, but if your case is unusual, this is your best option.
Dimmability and Controls: Why It Matters for Display Lighting
Dimmability isn’t just about lowering the lights for ambiance. It’s practical. When you want to photograph a piece, you can turn up the brightness. When you are just walking by at night, you can keep it low. It also lets you compensate for different ambient light conditions throughout the day.
Not all LED track heads are dimmable. Check the spec sheet. Even if the head is dimmable, the dimmer switch must be compatible with LEDs. Use a trailing-edge dimmer for best results. Leading-edge dimmers often cause flickering or buzzing with LEDs. Some brands include a compatible dimmer in the kit, which saves you a headache.
Smart controls are an advanced option. If you want to set a schedule-lights on at 6 PM, dim at 10 PM-smart dimmers work well. They aren’t necessary for most collectors, but they are nice if you want hands-off automation. Test the dimming with your fixture and dimmer before installing everything permanently.
Balancing Lighting Budget: What to Splurge and What to Save On
You don’t need to spend a fortune to get good results. But you need to know where to put your money.
Splurge on CRI: A CRI 95+ fixture costs more than a CRI 80 one, but you’ll see the difference every single time you look at your collection. This is the single best place to spend extra cash. Color accuracy is what makes your items look real.
Save on the track rail: Basic H-track rails from a standard brand work just as well as expensive designer rails. As long as the metal is sturdy and the conductors are clean, the rail is just a channel for power. Don’t overpay here.
Save on dimmers if you only need basic control: A standard trailing-edge dimmer costs $15 and works fine. You don’t need Wi-Fi connectivity unless you really want to schedule lighting from your phone.
The biggest waste of money is buying a cheap fixture with low CRI that you’ll replace in a year. That isn’t a saving. That’s a loss.
I’ve bought and sold at auctions, estate sales, and online marketplaces – and the best deals rarely come from the most obvious places.
Final Checklist Before You Buy
- Confirm your track type matches your existing system (H, J, or monorail). If you’re starting from scratch, start with H-track unless you need curves.
- Choose fixtures with CRI 90+ or higher. 95+ is even better for detailed or painted items.
- Select beam angle based on item size. Narrow spots for small items, wider floods for larger pieces or groups.
- Test color temperature with your specific collection before buying a full system. Buy one head first.
- Decide on dimming. Check that both fixture and dimmer are compatible with LEDs.
- Plan placement ahead of time. Mark positions for track and heads before drilling.
Now you’re ready to find the right setup for your collection.
Show Your Collection the Respect It Deserves
How you display your collection transforms it from a pile of objects into a curated story. The right case, lighting, and arrangement doesn’t just protect your items – it lets you enjoy them every day. Start with the essentials covered in this guide, prioritize UV protection and climate control for your most valuable pieces, and don’t be afraid to rotate your display. A well-presented collection inspires conversation, sparks joy, and reminds you why you started collecting in the first place.