Introduction
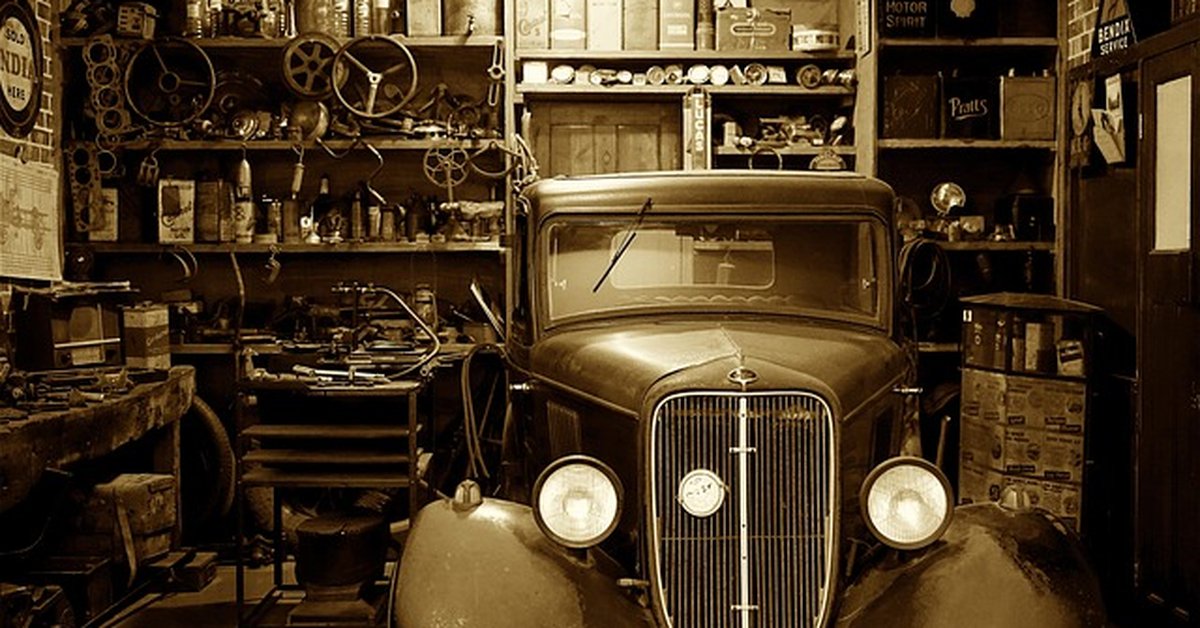
If you do restoration work, you already know the right tool makes all the difference. But what if the best tool for a job was made a hundred years ago? That is the thinking behind antique tool collecting for practical use. This is not about hoarding dusty relics. It is about finding high-quality, functional tools built to last and bringing them back to life. This article covers how to find, evaluate, and use antique tools for your restoration projects. You will learn where to look, what to buy, how to avoid costly mistakes, and what gear you need to get started. We have done some of the legwork so you can skip the beginner pitfalls and start collecting with confidence.
Why Antique Tools Matter for Restoration Work
There is a reason experienced restorers reach for old tools. They were built with a level of craftsmanship hard to find in modern mass-produced items. Take a drawknife, for example. An old one from a maker like W. Butcher will have a blade that holds an edge through hours of timber framing work. Modern versions often have thinner steel that dulls quickly. The same goes for hand planes. A Stanley Bailey plane from the early 1900s has a heft and precision that makes smoothing a reclaimed board a pleasure. You can feel the difference in the cut. These tools were designed for repeated use, not a single weekend project. They were made to be maintained and repaired, which is exactly what appeals to a restoration enthusiast. The weight, the balance, the way the handle fits your hand-it all adds up to better work. When you are restoring a piece of furniture or a building, you need tools that can handle stripping old finishes, shaping wood, and cutting precise joints. Antique tools deliver that. They also connect you to the history of the craft. Using the same type of plane a master carpenter used a century ago is a tangible link to the past. If you are serious about restoration, it is worth seeing what these tools can do. The first step is knowing where to start your search.
Where to Find Antique Tools: Best Sources for Restoration Projects
Finding good antique tools takes a little strategy, but the payoff is worth it. Here are the best places to look, with practical tips for each.
Estate Sales: This is often the gold mine. When a family clears out a home of a woodworker or mechanic, tools can be priced to move quickly. Go early on the first day. Bring cash and a list of what you are looking for. I have found Stanley planes and Disston saws for a fraction of their auction value at estate sales. what matters is being ready to buy when you see a good deal.
Flea Markets: Hit these on Sunday mornings when sellers are motivated to pack up. Walk the entire market before buying anything. Make an offer on a bundle if you see multiple tools you want. Sellers usually expect to haggle. Knowing brand names like Stanley, Disston, Miller Falls, and Union pays off here. You can walk away with a set of chisels for ten bucks if you are patient.
Online Marketplaces: eBay and Facebook Marketplace are the big two. On eBay, filter by “used” and sort by “ending soonest” to catch deals. Facebook Marketplace lets you see local listings. Set up alerts for keywords like “Stanley plane” or “old wrenches.” The downside is you cannot inspect the tool in person, so read descriptions carefully and ask for photos of the underside and edges. Look for tools with minimal rust and no cracks.
Specialized Auctions: There are auctions just for antique tools. Look for local collector club events or online auctions from reputable houses like The Tool Merchant. These can have higher prices, but the quality is often better. Preview days are your chance to inspect everything before bidding. A good condition tool at auction is usually worth the premium over a mystery find.
tip: Buy a good identification guide. A book like “The Tool Guide” by Egon Huey will help you spot a real find from a common piece. A reliable identification guide can save you from overpaying for junk.
Key Tool Categories Every Restoration Enthusiast Should Seek Out
Not all antique tools are equal for restoration work. Focus on these three categories to build a functional collection.
Woodworking Tools
This is where most restorers start. Look for chisels with clean handles and little pitting on the edge. Brands like W. Butcher, Marples, and Swan are reliable. Hand planes are the workhorses. A Stanley No. 4 or No. 5 is a classic. Check the sole for flatness-it should not rock. A flat sole means the tool is ready to use with some sharpening. Drawknives are essential for shaping curved surfaces. Look for one with a thick blade and no deep gouges.
Metalworking Tools
If you work with metal, old wrenches and files are invaluable. A vintage Crescent wrench from Ridge Tool or a set of Nichols files will outlast modern equivalents. Check the file teeth for evenness and the wrench jaws for wear. These tools are built to handle heavy use.
Measuring Tools
Precision is everything in restoration. Old squares from Starrett or Brown & Sharpe are far more accurate than cheap modern squares. A vintage caliper or micrometer is also a smart buy. Test the square against a known straight edge. If it is true, it is a keeper. These tools are often overlooked, but they save you from rebuilding a piece that is out of square.
Comparison Table
| Category | Best Use | Recommended Brands |
|---|---|---|
| Woodworking Tools | Shaping, planing, carving wood | Stanley, Disston, Marples |
| Metalworking Tools | Fabricating, filing, wrenching metal | Ridge Tool, Nichols, Craftsman |
| Measuring Tools | Ensuring square, level, and precise work | Starrett, Brown & Sharpe |
If you are just starting, grab a starter set of vintage chisels. A quality starter chisel set can get you going without breaking the bank.
How to Evaluate an Antique Tool Before Buying
Knowing what to check can save you from a bad purchase. Here is a practical checklist you can use at any sale or auction.
Check for Rust and Pitting: Surface rust is fine. It can be removed with a wire brush and oil. Pitting is deeper and weakens the metal. Run your fingernail over rusty spots. If it catches, that is pitting. Avoid tools with heavy pitting on the working edge of a plane or chisel. It will take too much metal off to fix.
Look for Cracks: Examine the handle of a mallet or the body of a plane. Hairline cracks can grow under use. A crack in a cast iron plane sole is a deal breaker. The tool will never work correctly. Tap the sole gently with a screwdriver. A solid sound is good. A dull thud could indicate a hidden crack.
Assess Missing Parts: A Stanley plane without its lever cap is a parts donor, not a tool. Check that the blade adjuster works smoothly. For a brace or drill, test the chuck. Does it open and close evenly? Are the jaws present? Missing parts are expensive to source and often not worth the hassle.
Evaluate Flatness and Sharpness: For a plane, place it on a flat surface like a pane of glass. Does it rock? If it does, the sole is warped. That is a major repair. For chisels and blades, look at the edge. Is it chipped or rounded? A dull edge is easy to sharpen. A chipped edge might require grinding away too much metal. I once saw a Stanley 45 plane for sale at a flea market with a slightly warped body. The seller did not notice, but I walked away. A warped plane is not worth the price no matter how rare the brand.
Practical Checklist:
- Visual inspection for cracks and heavy rust
- Check for all parts (adjusters, chucks, nuts)
- Test flatness on a known straight surface
- Evaluate edge condition (light rust is fine, chips are not)
- Assess joint tightness in folding rulers, squares, calipers
A magnetic angle finder is a handy tool for checking squareness. Carrying a magnetic angle finder makes it easy to verify a square or plane on the spot.
Common Mistakes to Avoid When Collecting Tools for Restoration
Even experienced collectors make these errors. Avoid them to save time and money.
Buying Tools with Too Much Damage: A heavily pitted edge or a cracked handle might seem like a bargain, but the cost and effort to restore them can exceed the value. I have seen collectors buy a brace with a broken wooden handle, only to realize a new handle costs $40 and custom fitting takes hours. Skip the fixer-uppers unless you plan to use them for parts or display only.
Overpaying for Common Tools: Just because a tool is old does not make it rare. A Stanley No. 4 plane made after 1950 is common. You should not pay more than $15-20 for one. Check a price guide before you buy. Knowledge of brand names and production dates is your best defense against overpaying.
Ignoring Tool Function for Aesthetics: A beautifully painted saw with a chipped blade is a display piece, not a working tool. Restoration is about function. Focus on tools that are structurally sound and can be tuned up to work. The patina of age is fine. Rust is not.
Failing to Consider Replacement Parts: Some tools are simple to fix. Others are not. A plane with a common lever cap is easy to replace. A specialized tool from a defunct maker might have no parts available. Before you buy, ask yourself: if this breaks, can I fix it? If the answer is no, think twice.
Restoration-Ready vs. Display Pieces: What to Choose
This is a critical distinction. Restoration-ready tools need a little clean up but are fully functional. Display pieces are pristine, rare, and expensive. Which one is right for you?
Restoration-Ready Tools: These are your bread and butter. They might have surface rust, a dull edge, and some surface dirt. But the structure is sound. The sole is flat. The adjustment mechanism works. You can bring one back to life in an afternoon with some oil and a sharpening stone. They cost less and give you the satisfaction of making a tool functional again. Start here.
Display Pieces: These are collector items. They have original paint, minimal use, and perfect condition. They sit on a shelf or in a museum case. They cost three to ten times more than a restoration-ready equivalent. For a restoration enthusiast, a display piece is not a working tool. It is a trophy. Only buy display pieces if you have extra money and want to admire the history. They will not help you restore a piece of furniture.
Comparison Table
Professional card grading costs $15–50 per card through PSA or Beckett, with turnaround times of 30–90 business days for standard service levels.

A single grade point difference – PSA 9 vs PSA 10 – can multiply a card’s value by 3–10×, making centering, corners, edges, and surface condition critical evaluation points.
| Attribute | Restoration-Ready | Display Piece |
|---|---|---|
| Price Range | $10 – $100 | $100 – $500+ |
| Function | Fully usable after light clean up | Primarily aesthetic |
| Rarity | Common to moderate | Rare to very rare |
| Best For | Practical restoration work | Collecting and investment |
For most restorers, restoration-ready is the way to go. You can build a functional set of tools for a fraction of the cost of display pieces.
Essential Gear for Transporting and Storing Antique Tools
Once you start collecting, you need to protect your finds. These items are practical investments.
Tool Rolls: A canvas or leather tool roll keeps chisels, files, and planes separated and safe. It prevents edges from hitting each other and dulling. Look for one with individual pockets. A canvas tool roll is a simple way to protect your edges during transport.
Magnetic Tool Trays: For metalworking tools, a magnetic tray keeps wrenches and files organized on your workbench. It also prevents them from rolling off the surface.
Padded Cases: If you travel to auctions or sales, a padded case protects delicate tools like squares and planes. A simple soft-sided cooler bag works well for this purpose.
Moisture-Absorbing Silica Packets: Rust is the enemy of antique tools. Throw silica gel packets into your storage boxes or drawers. Replace them every few months. Also store tools in a climate-controlled space if possible. A damp basement will ruin a collection fast. A pack of silica packets is an inexpensive way to keep moisture at bay.
Budgeting for Your First Year of Antique Tool Collecting
Starting out does not have to cost a fortune, but you need a realistic budget. Here is a breakdown based on experience.
Initial Tool Purchases: $50-200. This buys you a good starter set: a Stanley hand plane, a set of chisels, a couple of files, and a square. Focus on quality over quantity. A single excellent chisel is better than five cheap ones.
Restoration Supplies: $30-50. You need rust remover (Evapo-Rust or white vinegar), sharpening stones (a combination stone is fine), and some oil (3-in-1 or camellia oil). That is enough to clean up three or four tools.
Storage: $20-40. A shelf in a dry area plus tool rolls and silica packets. Do not overthink storage early on. As your collection grows, you can invest in a dedicated cabinet.
Books and Resources: $20-40. Buy one good book on tool restoration. Join a local collector group for free advice. The best resource is talking to people who do this every day. Many groups have monthly meetings or online forums.
Total First Year Budget: $120-330. That is reasonable for a hobby that pays for itself through better restoration work. A book on antique tool restoration is a great investment. A top-rated restoration book can teach you the basics quickly.
Finding and Attending Tool Auctions and Sales Events
Auctions are a prime source for high-quality tools, but they take planning. Here is how to work them.
How to Find Events: Check local historical societies, online collector forums (like the Mid-West Tool Collectors Association), and auction listing sites (like LiveAuctioneers). Set up email alerts for “antique tool auction” in your area. Many sales are held on Saturdays with preview the day before.
What to Expect: On preview day, you get to handle every tool. Arrive early. Bring your checklist and a magnet to test steel. Look under the table for boxes of common tools. Those are often overlooked. I once snagged a set of five Disston saws at an estate sale for $30 because they were under a pile of junk. The seller did not know the brand. He priced them as “old saws.” That is the kind of deal you find when you inspect everything.
Bidding Process: Set a max bid before the auction starts. Stick to it. It is easy to get caught up in the excitement. If a tool has visible wear, bid low. Auctioneers often start high, but if no one bids, the price drops fast. Wait for the “going once” before you raise your hand.

tip: Bring a friend. One person watches the tool, the other watches the auctioneer. It helps you stay focused. A guidebook on antique tool values can also help you set realistic bids. A price guide is a handy reference to avoid overbidding at auction.
Best Resources for Learning Tool Restoration and Maintenance
You do not have to learn everything on your own. These resources will accelerate your skills.
Books: “The Toolbox Book” by Jim Tolpin is a solid start for understanding tool history and function. “The Complete Guide to Sharpening” by Steve Bottorff will teach you how to get a razor edge on any blade.
YouTube Channels: Paul Sellers is a master teacher. His videos on restoring hand planes and sharpening chisels are step-by-step and easy to follow. Another good channel is “Makin’s Shapes” for in-depth restoration of specific tools like braces and braces.
Forums: Woodworking Talk has an active antique tool section. The Mid-West Tool Collectors Association website has a forum where you can ask specific questions. People there are generous with their knowledge. I have learned more from forum posts than from any book.
One Technique to Learn: Sharpening a plane iron. Master this, and you can make any antique plane cut like new. A restoration course can teach you the rest. A restoration course resource can help you build confidence quickly.
Final Checklist: Getting Started with Antique Tools
You now have the knowledge. Here is the action plan.
1) Identify your restoration needs. Are you working on furniture, buildings, or metal pieces? That determines what tools to prioritize. 2) Start with 3-4 essential tools. A hand plane, a set of chisels, a good saw, and a square. Build from there. 3) Set a budget. Stick to it, especially in your first year. 4) Find a reliable source. Estate sales and flea markets are your best bet for affordable finds. 5) Learn basic maintenance. Spend an afternoon cleaning and sharpening a single tool. That builds confidence. 6) Attend an upcoming auction. Putting theory into practice is the only way to get better. Start your search today by looking up local estate sales or a collector club meeting. The tools are out there. You just need to go find them.
Frequently Asked Questions About Antique Tool Collecting
How do I know if a tool is valuable?
Value depends on rarity, condition, and demand from other collectors. Check a price guide or an online auction database to see what similar tools have sold for. Brand names like Stanley, Disston, and Starrett often hold value. But a common tool in poor condition is not worth much. Look for unique features, a maker’s mark, or a patent date. That often signals a higher value.
Should I restore a tool or leave it as is?
That depends on your goal. If you intend to use the tool, restore it. Remove rust, sharpen the blade, and oil the moving parts. Do not over-polish it-patina is fine. If you are keeping the tool for display, leave it as is. Over-restoring can damage the value. In general, restoration for use is always better than leaving a tool rusty and non-functional.
Where can I sell tools that don’t fit my needs?
You can sell them on Facebook Marketplace, eBay, or at a local collector club meeting. The best method is to bundle them as a lot for a fair price. If you have a few tools that are not your area of interest, another collector will likely want them. You can also trade at a club meeting. Many members are happy to swap tools to fill gaps in their collections.
Happy collecting. The right tool is out there. Now go find it.
Start Building Your Collection Today
Every serious collector started exactly where you are now – curious, a little uncertain, and excited by the possibilities. what matters is to start small, learn continuously, and collect what genuinely interests you rather than what’s currently trending. The tools, techniques, and knowledge covered in this guide will serve you well, but nothing replaces hands-on experience. Get out there, make some careful purchases, and enjoy the journey. Your collection starts now.